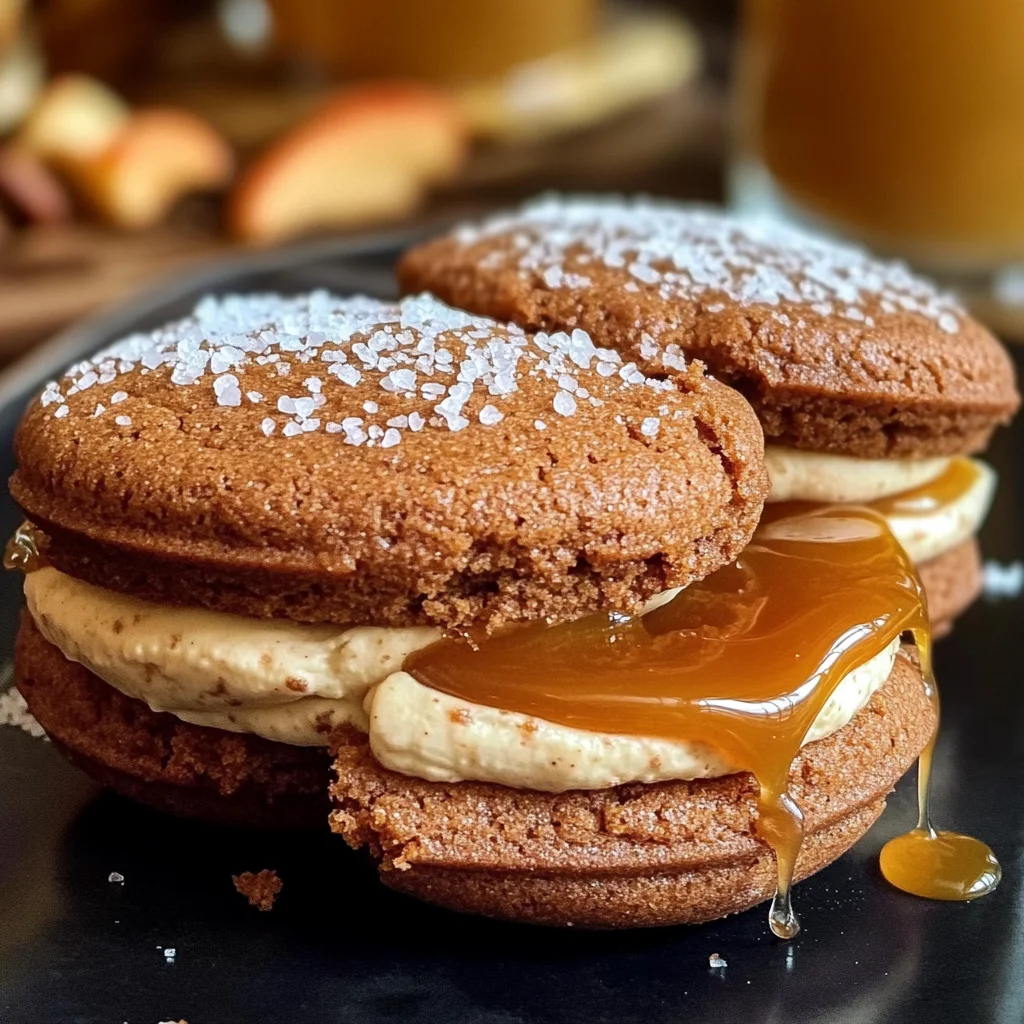
Apple Cider Whoopie Pies
If you’re looking for a delightful treat that captures the essence of fall, you’ve come to the right place! These Apple Cider Whoopie Pies are like a warm hug on a chilly day. With their soft, spiced cookies and creamy apple cider buttercream filling, they bring a cozy sweetness to any occasion. Whether you’re hosting a family gathering or just need a comforting snack after a long day, these whoopie pies will surely bring smiles all around.
There’s something truly special about baking with apple cider, especially when it’s reduced to concentrate its flavor. It adds that perfect autumnal touch that makes these treats irresistible. Plus, they are simple enough for even beginner bakers to whip up!
Why You’ll Love This Recipe
- Easy to make: With straightforward steps, these whoopie pies come together quickly, making them perfect for busy weeknights.
- Family-friendly: Kids love the fun of sandwiching the buttercream and caramel filling between the soft cookies!
- Make-ahead option: Prepare the cookies in advance and assemble them later for an effortlessly sweet dessert.
- Perfectly spiced: The warm spices combined with apple cider create a flavor explosion that screams fall in every bite.
- Versatile enjoyment: Great for parties, potlucks, or simply enjoying with your favorite hot beverage!

Ingredients You’ll Need
These Apple Cider Whoopie Pies use simple and wholesome ingredients you’ll likely have on hand. Let’s gather everything you need:
For the Whoopie Pies:
- 2 ½ cups all-purpose flour
- 1 tsp baking soda
- 1 tsp baking powder
- ½ tsp salt
- 1 tsp ground cinnamon
- ½ tsp ground nutmeg
- ¼ tsp ground cloves
- ½ cup unsalted butter, softened
- 1 cup light brown sugar, packed
- 1 large egg, room temperature
- 1 tsp vanilla extract
- 1 cup apple cider, reduced to ¼ cup (boil down 1 cup until it reduces)
- ½ cup whole milk
For the Apple Cider Buttercream:
- ½ cup unsalted butter, softened
- 3 cups powdered sugar
- ¼ cup reduced apple cider
- 1 tsp vanilla extract
- Pinch of salt
For the Caramel Filling:
- ½ cup store-bought caramel sauce (or homemade if you prefer)
- Pinch of flaky sea salt (optional)
Variations
This recipe is wonderfully flexible! Feel free to get creative and adapt it to your preferences.
- Add nuts: Chopped walnuts or pecans can be mixed into the batter for added crunch.
- Change up the filling: Swap out the caramel sauce for chocolate ganache or whipped cream for a different flavor experience.
- Try different spices: Experiment with other spices like ginger or cardamom to give your whoopie pies a unique twist.
- Make them mini: Use a smaller scoop to create bite-sized versions that are perfect for sharing!
How to Make Apple Cider Whoopie Pies
Step 1: Reduce the Apple Cider
Start by making the apple cider reduction. Pour 1 cup of apple cider into a saucepan and simmer over medium heat until it reduces to ¼ cup. This should take about 10-15 minutes. Once done, let it cool while you prepare the whoopie pie batter. Reducing the cider intensifies its flavor and sweetness—this is what makes your whoopie pies extra special!
Step 2: Make the Whoopie Pies
Preheat your oven to 350°F (175°C) and line two baking sheets with parchment paper. In a medium bowl, whisk together the flour, baking soda, baking powder, salt, cinnamon, nutmeg, and cloves. In a large bowl, beat together the butter and brown sugar until light and fluffy—this step is key for creating airy cookies! Add in the egg and vanilla extract, then mix until combined.
Gradually mix in your cooled apple cider reduction—it will add moisture and flavor! Alternate adding dry ingredients with milk in thirds; start and end with dry ingredients. Using a cookie scoop or tablespoon size drop rounded balls of batter onto your prepared sheets with about 2 inches apart. Bake for 10-12 minutes until firm and a toothpick comes out clean. Transfer them to a wire rack to cool completely.
Step 3: Prepare the Buttercream
In another medium bowl, beat your softened butter until creamy. Gradually add in powdered sugar followed by your cooled apple cider reduction, vanilla extract, and salt. Beat until smooth and fluffy—this luscious frosting is what will hold those delicious whoopie pies together!
Step 4: Assemble the Whoopie Pies
Pair up your whoopie pie halves by size so they fit nicely together. Pipe or spoon some of that delightful apple cider buttercream onto one flat side of each half. Drizzle caramel sauce over top (don’t forget—you can sprinkle some flaky sea salt if you want!). Gently press down with another half to create those lovely sandwiches. Repeat until all pies are assembled!
Now you have an irresistible batch of Apple Cider Whoopie Pies ready to be enjoyed! They’re sure to become your new favorite fall treat!
Pro Tips for Making Apple Cider Whoopie Pies
Baking can be a delightful adventure, and with these pro tips, your Apple Cider Whoopie Pies will turn out perfectly every time!
-
Measure Ingredients Accurately: Using a kitchen scale or measuring cups properly ensures the right texture and flavor. This is crucial for achieving the perfect balance between moistness and fluffiness.
-
Cool Your Cider Reduction: Allowing the apple cider reduction to cool before adding it to the batter prevents the butter from melting and helps maintain a nice, airy texture in your whoopie pies.
-
Don’t Overmix the Batter: Gently mixing your ingredients until just combined helps keep your whoopie pies soft and tender. Overmixing can lead to dense cookies that lose their delightful fluffiness.
-
Use Parchment Paper: Lining your baking sheets with parchment paper not only prevents sticking but also promotes even baking, giving you beautifully shaped pies every time.
-
Experiment with Fillings: While caramel is delicious, feel free to get creative! You can substitute with chocolate ganache or a spiced cream cheese filling for a different twist on this classic treat.
How to Serve Apple Cider Whoopie Pies
Serving these Apple Cider Whoopie Pies can be as fun as baking them! Whether you’re enjoying them at home or sharing them at a gathering, presentation adds an extra touch of warmth.
Garnishes
- Cinnamon Sugar Dusting: A light sprinkle of cinnamon sugar on top of the whoopie pies adds a sweet and spicy touch that enhances the autumn flavors.
- Caramel Drizzle: A drizzle of additional caramel sauce on top gives a beautiful finish and makes each pie even more tempting.
- Chopped Nuts: A sprinkle of finely chopped pecans or walnuts adds crunch and complements the flavors beautifully.
Side Dishes
- Warm Apple Cider: Serve your whoopie pies alongside a steaming mug of warm apple cider for a cozy pairing that’s perfect for fall.
- Vanilla Ice Cream: A scoop of creamy vanilla ice cream adds delightful contrast and richness to the spiced whoopie pies, creating an indulgent dessert experience.
- Roasted Pumpkin Soup: The savory warmth of roasted pumpkin soup makes an excellent starter, balancing out the sweetness of the whoopie pies while keeping with the autumn theme.
- Spiced Chai Tea: A cup of spiced chai tea offers aromatic warmth that complements the flavors in your whoopie pies and makes for an inviting afternoon treat.
Now you’re all set to bake, serve, and enjoy these scrumptious Apple Cider Whoopie Pies! Happy baking!
Make Ahead and Storage
These Apple Cider Whoopie Pies are perfect for meal prep! You can easily make them ahead of time for gatherings, or simply to enjoy throughout the week.
Storing Leftovers
- Store any leftover whoopie pies in an airtight container at room temperature for up to 3 days.
- If you prefer softer filling, you can refrigerate them, but be sure to let them come back to room temperature before serving.
Freezing
- For longer storage, freeze the assembled whoopie pies by placing them in a single layer on a baking sheet until solid.
- Once frozen, transfer them into a freezer-safe bag or container, separating layers with parchment paper to prevent sticking.
- They can be frozen for up to 2 months.
Reheating
- To enjoy the whoopie pies warm, allow them to thaw in the refrigerator overnight.
- You can microwave them for about 10-15 seconds or warm them in an oven preheated to 350°F (175°C) for about 5 minutes.
FAQs
Here are some common questions you might have about making Apple Cider Whoopie Pies!
Can I use regular apple juice instead of apple cider?
While apple juice can be used in a pinch, it lacks the rich flavor of apple cider. For the best results and authentic taste in your Apple Cider Whoopie Pies, stick with apple cider.
How do I know when my whoopie pies are done baking?
The whoopie pies are done when they feel firm to the touch and a toothpick inserted into the center comes out clean. Keep an eye on them as they bake; they typically take about 10-12 minutes.
Can I make these Apple Cider Whoopie Pies gluten-free?
Yes! You can substitute all-purpose flour with a gluten-free 1:1 baking blend. This will give you delicious results while keeping it gluten-free.
What can I use instead of caramel sauce?
If you’d like a different filling option, consider using a chocolate ganache or a dairy-free cream cheese frosting as an alternative to caramel sauce in your Apple Cider Whoopie Pies.
Final Thoughts
I hope you find joy in making these delightful Apple Cider Whoopie Pies! They beautifully capture the essence of fall with their cozy flavors and textures. Whether you’re sharing them at a gathering or enjoying them as a sweet treat on your own, I’m sure they’ll bring warmth and happiness to your day. Happy baking!
Apple Cider Whoopie Pies

Indulge in the comforting flavors of fall with these delightful Apple Cider Whoopie Pies. Soft, spiced cookies are lovingly sandwiched together with a creamy apple cider buttercream and a drizzle of caramel filling, creating a treat that’s perfect for any autumn celebration. Whether you’re hosting a gathering or simply treating yourself after a long day, these whoopie pies are sure to spread joy. The warm spices and rich apple cider essence make each bite a cozy experience that captures the spirit of the season. Plus, they’re easy enough for bakers of all levels to master!
- Prep Time: 20 minutes
- Cook Time: 12 minutes
- Total Time: 32 minutes
- Yield: Approximately 12 servings 1x
- Category: Dessert
- Method: Baking
- Cuisine: American
Ingredients
- 2 ½ cups all-purpose flour
- 1 tsp baking soda
- 1 tsp baking powder
- ½ tsp salt
- 1 tsp ground cinnamon
- ½ tsp ground nutmeg
- ¼ tsp ground cloves
- ½ cup unsalted butter, softened
- 1 cup light brown sugar, packed
- 1 large egg, room temperature
- 1 tsp vanilla extract
- 1 cup apple cider, reduced to ¼ cup
- ½ cup whole milk
- ½ cup unsalted butter, softened (for buttercream)
- 3 cups powdered sugar
- ¼ cup reduced apple cider (for buttercream)
- 1 tsp vanilla extract (for buttercream)
- Pinch of salt (for buttercream)
- ½ cup store-bought caramel sauce (or homemade if you prefer)
- Pinch of flaky sea salt (optional)
Instructions
- Reduce apple cider in a saucepan until it thickens to about ¼ cup; cool.
- Preheat oven to 350°F (175°C) and prepare baking sheets.
- Mix dry ingredients: flour, baking soda, baking powder, salt, and spices.
- In another bowl, cream butter and sugar; add egg and cooled cider reduction.
- Combine dry ingredients alternately with milk; drop batter onto sheets.
- Bake for 10-12 minutes until firm; cool completely.
- Prepare buttercream by mixing softened butter with powdered sugar and cooled cider reduction.
- Assemble whoopie pies by sandwiching filling between cookies.
Nutrition
- Serving Size: 1 serving
- Calories: 220
- Sugar: 18g
- Sodium: 180mg
- Fat: 9g
- Saturated Fat: 5g
- Unsaturated Fat: 3g
- Trans Fat: 0g
- Carbohydrates: 34g
- Fiber: 1g
- Protein: 2g
- Cholesterol: 25mg